QuickBooks’ sales tax tracking features help you track the “who, what, why, where, and how much” of sales tax. The ultimate goal of QuickBooks sales tax tracking system is to properly calculate and collect sales tax and to properly report revenues tax collections, and tax payments in two two-dimensional reports called Sales Tax Revenue Summary and Sales Tax Liability.
When you set up customers (the “who”) in QuickBooks, you assign a default Sales Tax Code and Sales Tax Item to their customer record. When you set up Items in QuickBooks, you assign a Sales Tax Code and Sales Tax Item to each Item. As you think about how to set up and record sales tax in QuickBooks, keep in mind the following concepts:
Sales Tax Codes are used for three purposes. One purpose is to describe whether each customer is taxable or not, according to where they live, or what your business relationship is with that customer. For example, to track revenue from your out of state customers, you’ll should create a tax code called OOS (for out of state). If you sell to resellers, you will want to define a tax code of RSR (for Reseller). The second purpose is to tag certain sales items according to whether they are taxed or not. For example, if you do not charge sales tax on services, you should create a tax code called SRV (for service). Then, assign the Sales Tax Code SRV to your service Items. The third purpose of Sales Tax Codes is to track revenues according to which tax is charged (or not charged).
You should not have a Sales Tax Code called “NON” (Non-Taxable), because each non-taxable Sales Tax Code should specify WHY a customer, or an Item is not taxed. An item called NON would not give you enough information when looking at your sales tax liability reports.
Sales Tax Items are about the rate of tax to be charged, and which tax agency collects that tax. You should set up tax items for each individual tax you need to track, along with the rate, and agency to which you pay that tax.
Tax Groups are used when you collect multiple taxes that are paid to SEPARATE tax agencies. So for example, if your county or city charges a combined tax rate for the State, County, and District tax, AND IF you have to separately pay those taxes to the state, county, and district, then you’ll need to create sales tax items for each component of the total tax, and then create a sales tax group that combines all those rates into a single line-item for your sales forms.
Items are used to specify each product or service that you sell. Items are either taxable or non-taxable. When you set up an Item in QuickBooks, you define the name, the type, the Tax Code, and the Tax Item that will be used, by default, when you sell the Item. However, if specified in the customer record, the customer’s Tax Code and Tax Item overrides both the Tax Code and the Tax Item when creating a sale. You can further override the Tax Code and/or Tax Item by manually changing them on a sales receipt or invoice.
Sales Tax Codes
Sales Tax Codes help you track “why” a customer or item is taxable or not. A Sales Tax Code is assigned to each customer as well as to each product or service Item.
If your sales tax agency requires reporting for different types of exempt sales, you should create a separate Sales Tax Code for each non-taxable customer type or item type (e.g., RSR for non-taxable resellers and SRV for non-taxable service items).
Setting up Sales Tax Codes
To set up a new Sales Tax Code, select New from the Sales Tax Code menu at the bottom of the Sales Tax Code List.
Figure 1 Sales Tax Code List
Using Sales Tax Codes on Sales Forms
If you specify a taxable Sales Tax Code in the Customer Tax Code field on sales forms, QuickBooks will charge sales tax (see Figure 2). If you use a non-taxable Sales Tax Code, QuickBooks will not charge sales tax unless you override the sales tax code (to a taxable code) on one of the lines in the body of the form.
Figure 2 Invoice with taxable items
When you set up a customer record, the Sales Tax Code you enter in the customer record becomes the default in the Customer Tax Code field on sales forms (see Figure 2).
Similarly, when you set up Items, the Sales Tax Code you enter in the Item record becomes the default Tax Code in the body of sales forms (Figure 3).
You can override the Sales Tax Code at the bottom of sales forms (by using the Customer Tax Code drop-down list), or on each line in the body of the Invoice.
Editing the Sales Tax Codes on Items and Customers
Assigning Sales Tax Codes to Items
To assign a default Sales Tax Code to an Item, edit the Item and set the Tax Code field to the tax code that should be used when this item is sold.
Figure 3 Edit the Sales Tax Code on each Item as necessary
Assigning Sales Tax Codes to Customers
To view and edit Sales Tax Codes on customer records, edit the customer and update the tax code and tax item in the Sales Tax Settings tab.
Figure 4 Editing the Sales Tax Information for customers
Note: Jobs follow the sales tax status of their parent Customer, so no sales tax information is shown on the Additional Info tab of a Job record. Jobs show on reports with a colon (:) after the customer name.
Categorizing Revenue Based on Sales Tax Codes
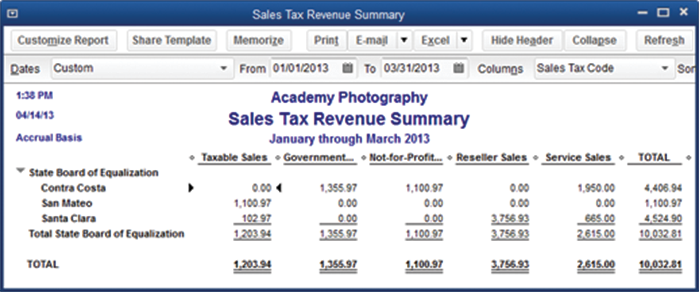
QuickBooks provides a breakdown of revenue by Sales Tax Code on the Sales Tax Revenue Summary report (see Figure 5). To display the report, select Vendors & Payables from the Reports menu and then select Sales Tax Revenue Summary.
Figure 5 Sales Tax Revenue Summary with separate columns for each Sales Tax Code
If your sales tax agency requires a detailed breakdown of tax exempt sales, use Sales Tax Codes to produce the information you need. Use Sales Tax Codes to categorize your sales by the reason you charged, or did not charge, sales tax.
While sales tax can be tracked in QuickBooks, those who have complicated sales tax situations should consider using Avalara’s Avatax. This product can be added onto QuickBooks or almost any other accounting system to calculate, manage, and file sales tax returns. For more information about Avalara, see www.avalara.com.
Thanks for reading CPA Practice Advisor!
Subscribe Already registered? Log In
Need more information? Read the FAQs


